
With the release of version 2.3, [Sidus Link Pro] moves beyond the 2D layout and into a fully realized 3D environment. Whether you are mid-flight to your next destination or on set planning tomorrow's work, the 3D Visualizer allows you to build a real-world space to verify rig placement, shadows, and falloff before the crew even arrives. It’s a fully functional control surface where you can select fixtures, adjust values, and manage playback without ever switching views. By integrating your layout and cues into one immersive window, you stop looking at icons and start looking at the light itself.
Getting Started: Entering the 3D Workspace
Accessing the 3D Visualizer is a straightforward process within the [Sidus Link Pro] interface. Follow these steps to enter the environment:
- Open Your Project: Start by opening a new project or an existing one.
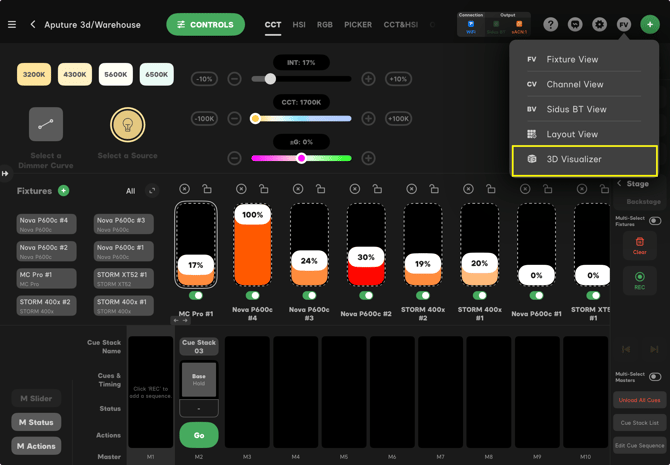
- The FV Menu: Look toward the top right of the screen, specifically near the green plus (+) icon. You will see a button labeled FV (Fixture View).
- Switch to 3D Visualizer: Tap the FV button and select 3D Visualizer from the dropdown menu.
Navigating the 3D Space
Moving through your virtual set is handled with simple touch gestures:
- Pan and Tilt: Use one finger to rotate your view up, down, left, or right.
- Move the Screen: Use two fingers to slide the entire view up, down, or side-to-side.
- Zoom: Pinch with two fingers to move in for detail or pull back to see the whole room.
The Master Key: Edit Mode
To build your environment or move your gear, you must enter Edit Mode. This toggles the 3D space from a "Performance" view into a "Construction" view.
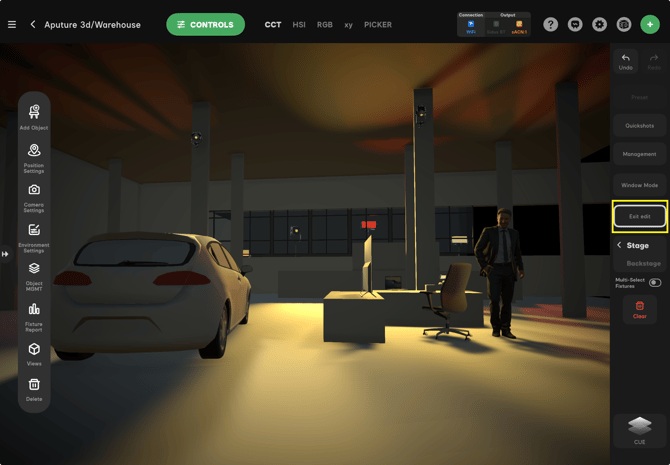
- Activate Edit: Tap the Edit button on the right-side menu. This unlocks the left-hand toolbar, allowing you to add objects and adjust the placement of your fixtures.
- Exit Edit: Once your set is built and your lights are positioned, tap Exit Edit. This locks the entire environment so you don’t accidentally move a set piece or a fixture while you are busy programming. (Note: We will cover how to lock individual objects for even more control later in this guide).
The Viewer Tools: Information at a Glance
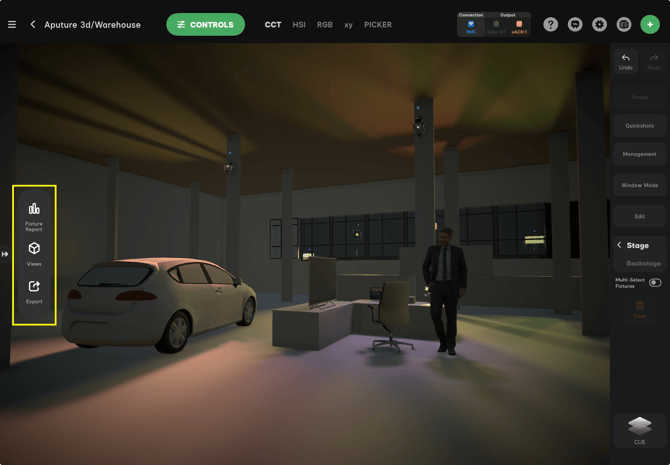
Before you toggle into Edit Mode, you have access to a set of diagnostic and navigation tools. These allow you to audit your rig and jump between perspectives without changing any of your 3D placements.
- Fixture Report: This is your digital inventory. It provides a complete breakdown of every light in your 3D space—including the fixture name, DMX profile, universe, address, and its specific X, Y, and Z coordinates.
- Views: This menu contains camera presets that let you jump to a perfectly aligned Front, Left, Right, or Top perspective. If you ever lose your orientation while navigating, use the Reset view button to snap the camera back to the middle of your screen.
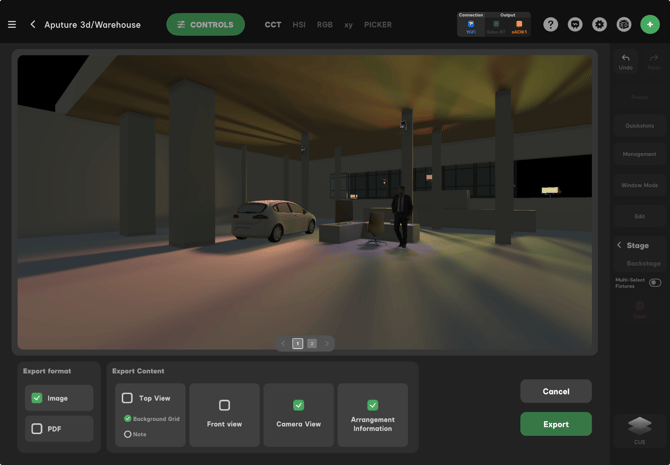
- Export: Use this to share your progress or document the build. You can save high-quality images of your current camera angle or export your Fixture Report—a data file containing all of your [Sidus Link Pro] 3D placement details for your records or the rest of your crew.
The Workspace: Activating Edit Mode
Once you tap Edit, your 3D environment transitions from a live control surface into a full-scale construction zone. The sidebar expands to reveal your design tools, giving you the power to manipulate every physical detail of your virtual stage. While you are in Edit Mode, your focus shifts from triggering cues to building the world your lights live in and adjusting their placement.
We’ll break down each of these options below so you can master the physical placement and behavior of your rig.
Add Object: Building Your Space
The Add Object menu is your construction library. This is where you populate your 3D space with the physical elements that define your set, allowing you to replicate the real-world environment before you arrive or while you're on set.
- Asset Library: Choose from an array of 3D models including vehicles, furniture, and human figures. By placing these precisely where they will sit in real life, you can accurately predict how your light will interact with the talent and the environment.
- Virtual Fixture Plotting: Within the objects bar, you can click and drag virtual lights directly into your scene. These act as placeholders that allow you to design your layout and verify your angles immediately. Because these are virtual, you have the flexibility to patch them later, once your rig is finalized.
- Lighting Accessories: Beyond set dressing, you can add critical tools like backdrops, bounces, and flats. This allows you to verify reflections and shadow play in the virtual space, ensuring you fully understand the placement of your rig before you start the physical build.

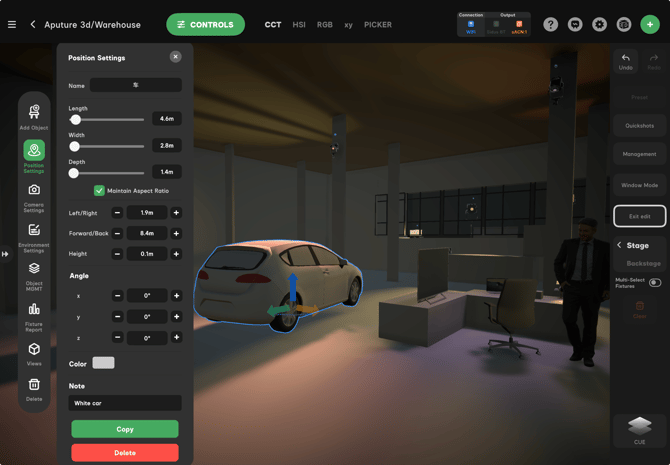
Object Settings: Precision Placement
Once an object is in your scene, Object Settings allow you to refine its physical presence and location. You have two ways to move and scale your objects:
- Tactile Control (Directional Arrows): When an object is selected, you will see blue, green, and orange arrows. Tapping and dragging these directional arrows is an efficient way to physically slide the object through the 3D space.
- Numerical Precision: Within the Position Settings menu, you can use the +/- buttons for Left/Right, Forward/Back, and Height to nudge objects into the exact spot required. This is also where you use the Length, Width, and Depth sliders to scale your objects to match their real-world dimensions.
- Angle and Orientation: Use the X, Y, and Z Angle controls to rotate your objects or fixtures. This ensures every piece of gear is oriented correctly for your lighting plan.
- Organization: You can even change the base Color of an object and add a Note—like "White car"—to keep your workspace organized and easy to navigate for the rest of the crew.
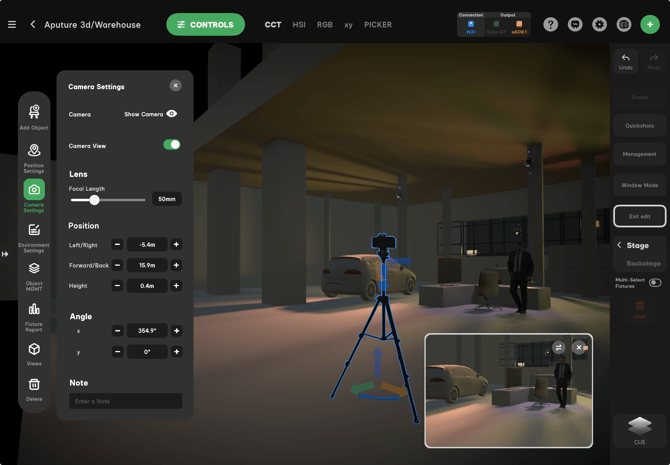
Camera Settings: The Director’s Perspective
The Camera Settings tool allows you to place a physical camera into your 3D space. This is essential for pre-visualizing exactly what the lens will see, helping you justify every light placement based on the final frame.
- Camera vs. Camera View: Toggle Show Camera to see the physical camera body on your set. Tapping Camera View opens a dedicated pop-up window that shows you the live feed from that specific lens.
- Lens Selection: Use the Focal Length slider to match your real-world glass. Whether you're shooting a wide 14mm master or a tight 85mm close-up, the 3D Visualizer accurately represents the field of view in your pop-up monitor.
- Placement and Precision: Just like other objects, you can move the camera using the directional arrows or use the Position and Angle menus to dial in a specific height and tilt.
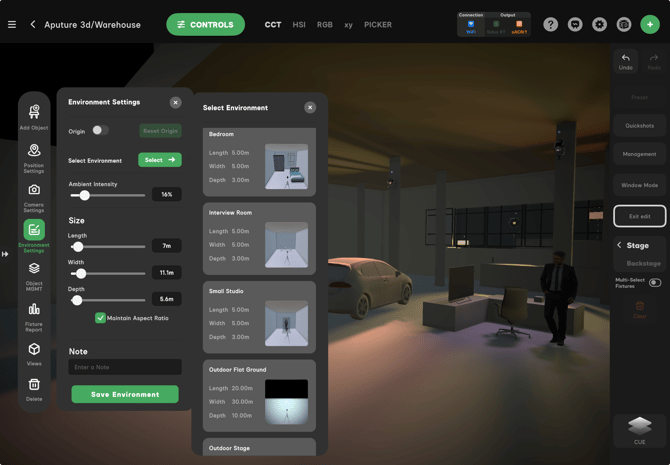
Environment Settings: Defining the Space
The Environment Settings tool allows you to build the overall room or location where your scene takes place. Instead of starting in a digital void, you use this menu to select and scale the boundaries of your stage.
- Selecting an Environment: Tap Select to choose from a library of preset environments. Whether you need a simple Bedroom, a corporate Interview Room, or a professional Small Studio, these presets provide the walls and floor you need to begin your lighting setup.
- Environment Scaling: Once a preset is selected, use the Length, Width, and Depth sliders to define the exact dimensions of the room. By matching these to the real-world measurements, you ensure your fixtures have the correct boundaries to reflect and fall off.
- Ambient Intensity: This is a crucial control. Use the Ambient Intensity slider (currently set to 16% in this example) to establish the baseline level of "fill" light already present in the location. This lets you accurately simulate how much practical light from existing sources is illuminating the shadow areas of your scene.
- Organization and Save: Use the Note field to name this specific setup—like "Stage A Warehouse"—and tap Save Environment to store your configuration for future use or other projects.
Object Management: Organizing Your Set
As your 3D scene grows more complex, Object Management becomes the central hub for keeping your workspace organized. This menu acts as a master list for every element in your environment, categorized by Fixtures, Modifiers, and Props.
- Visibility and Focus: Use the Eye icon to hide or show individual objects. This is useful for temporarily clearing "clutter" from your view—like a ceiling or a large wall—so you can focus on adjusting lights in a tight corner without objects blocking your perspective.
- Locking for Precision: Tap the Padlock icon to lock an object’s position. Once locked, that item cannot be moved or resized. This is a critical step once you have your walls or heavy furniture set; it ensures you don't accidentally "bump" your environment while you are trying to precisely position your fixtures.

Fixture Report: The Digital Paperwork
The Fixture Report is your automated gear list and patch sheet. It pulls the data directly from your active setup and generates a comprehensive table of every light in your 3D environment.
- Inventory List: The report provides a complete list of every fixture by name and type—from INFINIBARs to STORM 400x units. This allows you to quickly verify your total unit count and see exactly what is currently in your 3D scene.
- Technical Specifications: The table displays the specific Profile (e.g., CCT&RGB 8Bit) and Fixture Status for every light currently active in Sidus.
- DMX and Addressing: The report includes columns for Universe and Address. Having this data in one centralized spreadsheet view makes it easy to manage your data distribution across the rig.
- Coordination: Because this report is generated directly from your 3D workspace, it acts as a "single source of truth" for the crew, ensuring everyone is working off the same fixture numbers and patching data.

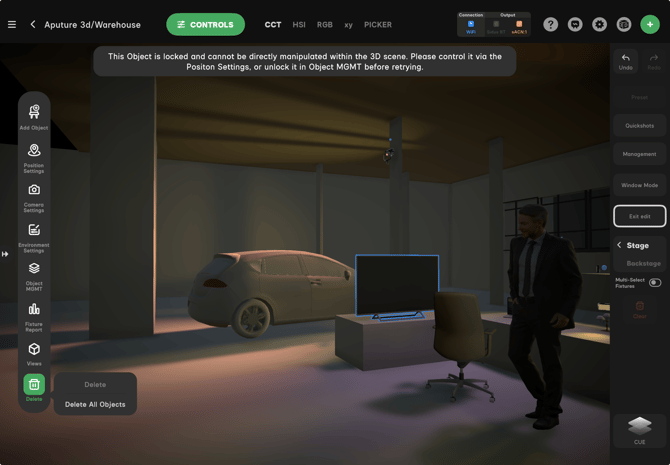
The Delete tool (Trash icon) is used to remove elements from your 3D environment. When you select this tool, you are given two options to manage your workspace:
- Delete: This removes the specific object or fixture you currently have selected.
- Delete All Objects: This is a "global reset" that clears every object, fixture, and prop from the environment, returning you to an empty 3D stage.
Pro Tip: If an object is locked in Object MGMT, you won't be able to delete it until it is unlocked.
Performance Mode: Live Control and Workflow
Once you tap Exit Edit, the environment shifts from construction to live execution. This is where your planning meets real-time control, allowing you to manipulate your rig with the full power of the Sidus console.
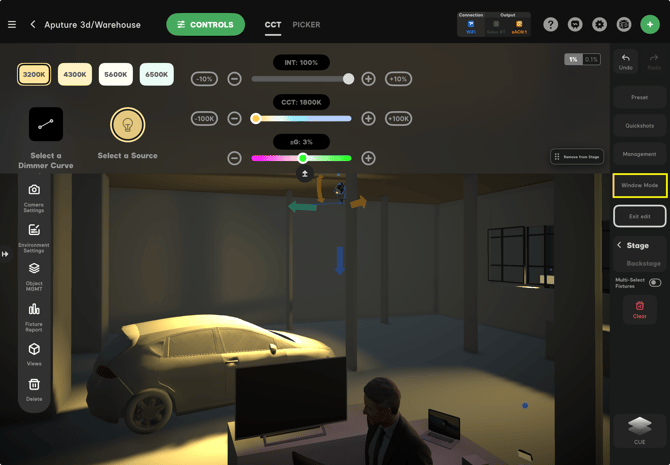
- Direct Fixture Control: Simply tap any light in the 3D space to bring up its full set of controls. From here, you can adjust intensity, CCT, and color parameters, as well as refine the focus of the beam to hit your marks precisely.
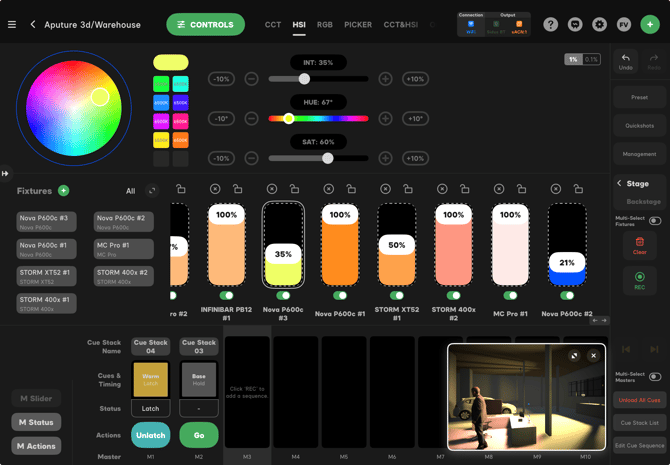
- Window Mode: For the ultimate flexible workflow, you can enter Window Mode. This moves your fixtures, groups, and cue stacks to the primary screen while the 3D Visualizer becomes a small, floating window.
- Custom Workspace: The 3D window is fully moveable, allowing you to place it anywhere on your screen. This layout lets you focus on your console data and cue timing while maintaining a live visual reference of the set, letting you work in the way that best fits your specific needs.
Conclusion: Shaping the Future of Your Workflow
The [Sidus Link Pro] 2.3 3D Visualizer is more than just a viewing gallery; it is a bridge between technical planning and creative execution. By moving your workflow into a three-dimensional space, you gain the ability to troubleshoot shadows, verify bounce angles, and refine your cues long before the first fixture is powered on.
Whether you are using the Visualizer as a full-screen immersive environment or as a floating reference in Window Mode, the goal remains the same: to give you absolute certainty in your design. Because your 3D environment and Fixture Report act as a single source of truth, you can hand your layout over to the rigging crew with the confidence that every question regarding placement, patching, and orientation is already answered. As you master these tools, you’ll find that you aren't just managing a patch—you are truly shaping the light.