
Custom DMX profiles are saved on the device where you built them. To give a profile to a colleague, or to use it on another device, save the profile to a file, send that file, and import it into the Custom library on the other end. Once imported, the profile works exactly like one you built yourself.
Plan requirement. Custom DMX Profiles require the Pro or MAX plan on both the sending and the receiving device. See Plans Overview: Free vs. Pro vs. Max Compared.
Step 1: Create the Custom Profile
Build the profile from the fixture manufacturer's DMX chart, or start from an existing profile with Copy to Custom and edit it. The full walk-through is in Creating Custom DMX Profiles.
Before you share it, test the profile on a real fixture. Bring the fixture to the Stage, move each parameter, and confirm the right channel responds in the DMX Output Window. A mistake in a shared profile becomes a mistake on every device that imports it.
Name it so others can find it. Fill in Manufacturer, Series, Model, Profile Number, and a clear Profile Name (for example, "CCT, RGB, Strobe - 8 bit v2"). The person importing it browses by those fields.
Step 2: Save the Profile to a File
- Open the tools menu and select Create Local Backup.
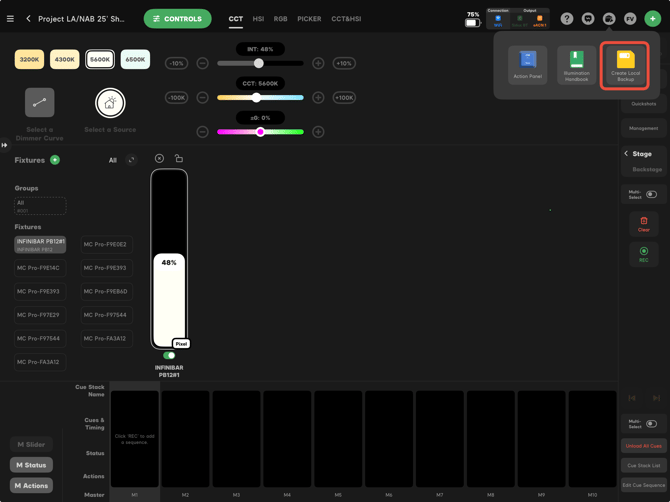
- Choose where to save it. On iPad, pick a location in Files such as iCloud Drive or On My iPad. On Mac, pick any Finder location.
- You can also save the file by opening the Folders Menu and selecting the show file you'd like to save and share.
- Tap the 3 dots on the Project and choose Save to File or Share from the dropdown menu.
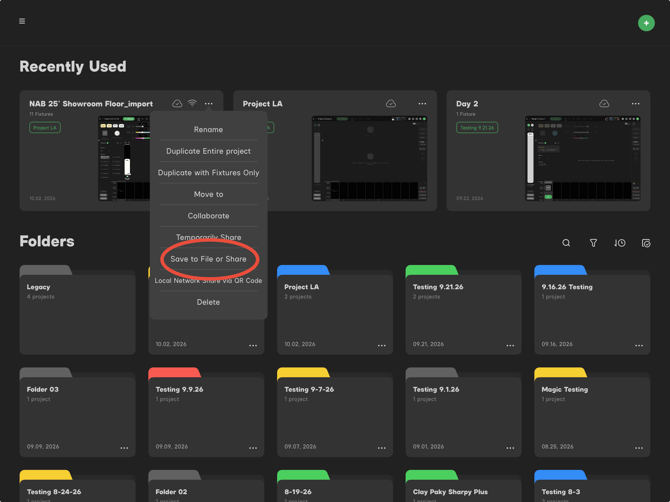
- Choose where to save it. On iPad, pick a location in Files such as iCloud Drive or On My iPad. On Mac, pick any Finder location.
Step 3: Send the File
The saved profile is a regular file, so send it however your team already shares files: AirDrop, email, Messages, a shared iCloud or Google Drive folder, or a USB drive. Keep the file name as-is so it's easy to match to the profile.
Step 4: Import the File
On the receiving device:
- Save the file somewhere the Files app can reach (on Mac, anywhere in Finder).
- Open Sidus Link Pro, open the side menu, and select Library.
- Open the Custom library and tap Import.
- Browse to the profile file and select it.
Step 5: Add It to Your Custom Library
- Review the profile details: Manufacturer, Series, Model, Profile Number, Profile Name, and channel count.
- Confirm to add the profile to your Custom library.
- To use it, tap Add New Fixtures, choose Manual Setup, then Select a Profile and open Custom. The imported profile is listed with the rest of your custom profiles.
Patch it like any other fixture. See Patching a DMX Fixture.
Updating a Shared Profile
If you fix or improve a profile after sharing it, save it to a file again and resend it. Fixtures already patched in a show keep the profile they were patched with, so the receiver needs to re-patch those fixtures to pick up the change. Adding a version to the profile name ("v2", "v3") makes it clear which one is current.
Common Mistakes
- Fixture in the wrong mode. The profile matches one DMX mode. If the fixture on the receiving end is set to a different mode, every channel after the mismatch is offset. Check the mode on the fixture's menu.
- Sending a show without its profiles. When you send a show file that uses custom profiles, send the profile files along with it so the receiver's patch matches yours. See Importing a Project.
- Confusing custom profiles with GDTF files. A saved custom profile is a Sidus Link Pro file. A .gdtf file is the open industry format published by fixture manufacturers, and it is imported separately.
Related Articles
- What Are Custom DMX Profiles?
- Creating Custom DMX Profiles
- Advanced DMX Parameters
- Library and Cloud Services
- Importing a Project
Need Help?
See Getting Help & Support for the fastest way to reach the Aputure team.