![Aputure_amaran_KnowledgeBase_Logo.png]](https://help.aputure.com/hs-fs/hubfs/Knowledge%20Base/company%20files/Aputure_amaran_KnowledgeBase_Logo.png?height=40&name=Aputure_amaran_KnowledgeBase_Logo.png)
Open System Settings from the Menu to configure the fixture's general behavior: Accessory, Dimming Curve, Power and Output, White Light Standard, Fan Mode, Studio Mode, Screensaver, Language, Product Information, Firmware Update, Factory Reset, and Lead/Follow Mode.
Accessory
When the fixture is equipped with the motorized CF16 Fresnel, use this menu to manually adjust the beam angle. When using an Aputure Mount optical accessory, the accessory type appears here. Supported accessories: Narrow-angle reflector, Medium-angle reflector, Wide-angle reflector, Barn Door adapter, AM Light Dome 150, AM Lantern 120, and AM Lantern 180.
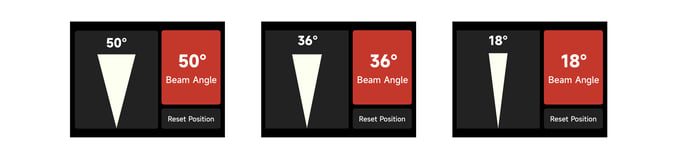
Only the Medium-angle reflector ships in the box. Other optical accessories are sold separately.
Dimming Curve
Choose between Linear, Logarithmic, S-Curve, and Exponential dimming curves.

Power and Output
Output Mode: Constant Output keeps the lamp's brightness consistent throughout the color temperature range. Max Output prioritizes brightness throughout the color temperature range.

Max Power Draw: set the fixture's maximum AC power draw and the length of the Lamp Head Cable in use. The fixture automatically limits LED power output to keep the power supply stable. For every additional 7.5 m of Lamp Head Cable, maximum LED output decreases by 55W.
Set the Head Cable Length accurately. Setting it too short causes the fixture to exceed its rated output and triggers an error warning (disconnect the cable, correct the length, then power-cycle the fixture). Setting it too long is safe but slightly reduces output brightness.

Household Power Settings: when powering the fixture through an indoor socket with the Aputure-supplied AC power cable and a NEMA 5-20P plug, set the default maximum input power limit to either 1700W (15A, 120V) or 2200W (20A, 120V). If you're unsure of your circuit's capacity, choose 1700W to avoid tripping a breaker or overheating the wiring.

Each time the fixture powers on through a 15A/20A cable, a Select Max Input Power pop-up prompts you to choose a power rating for that session:
- Apply – takes effect immediately for the current session only; the fixture reverts to its saved default on the next power cycle
- Save – stores the value as the default startup power without changing the current session's limit
- Apply & Save – takes effect immediately and becomes the new default for future power cycles

White Light Standard
- CIE Daylight – meets the sunlight standard (2500K–10000K, Duv controlled at 0.0020–0.0040)
- Blackbody – meets the blackbody luminescence standard (Duv controlled near the blackbody trajectory line)

Fan Mode
- Smart – automatically adjusts fan speed for the lowest noise possible at the current temperature (-20°C/-4°F to 45°C/113°F)
- Max – runs the fan at maximum speed at all times for maximum cooling
- High – constant fan speed, optimal cooling (-20°C/-4°F to 45°C/113°F)
- Medium – constant fan speed, balances noise and operating range (-20°C/-4°F to 35°C/95°F)
- Low – constant fan speed, optimizes for noise at 75% of maximum output (-20°C/-4°F to 35°C/95°F)
- Delayed – fan activation is delayed until the COB reaches 75°C/167°F
- Silent – runs the fan at its lowest speed and limits maximum output to 550W (-20°C/-4°F to 45°C/113°F)

Studio Mode
When Studio Mode is on, the fixture powers on as soon as it receives live power. When off, press the Power Button to turn the fixture on or off.

Screensaver
Choose the screensaver's timeout and display behavior.

Language
Choose English or Chinese.

Product Information
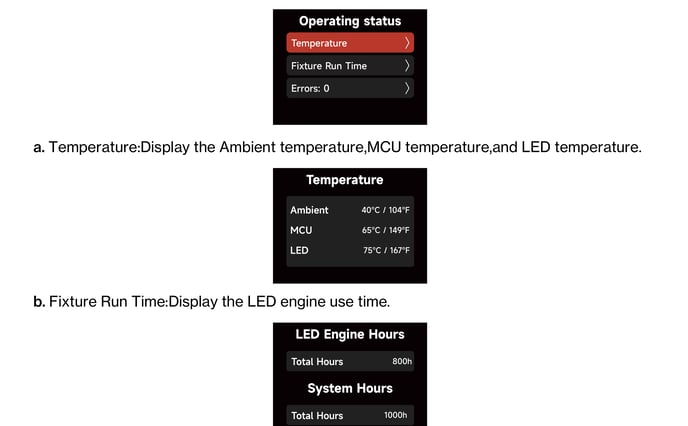
View the Firmware Version, SN, Sidus BT ID, and Hardware Version for both the Control Box and connected Lamp Head, along with Operating Status: Temperature (Ambient, MCU, LED), Fixture Run Time, and Errors. General errors leave the fixture usable; serious errors lock the fixture until resolved.

Firmware Update
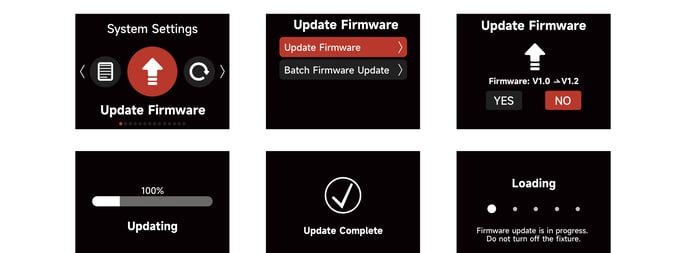
Insert a USB flash drive with the latest firmware on its root directory into the Control Box's USB-A port to upgrade. Firmware updates must be performed with a USB flash drive. Always update both the Control Box and the connected Lamp Head.
Factory Reset
Select YES to factory reset the fixture, or NO to cancel. You can also choose whether to reset CRMX and Sidus BT, and set the default language.

Shortcut: press and hold the MENU button for 5 seconds to jump directly to the Factory Reset screen.
Lead/Follow Mode
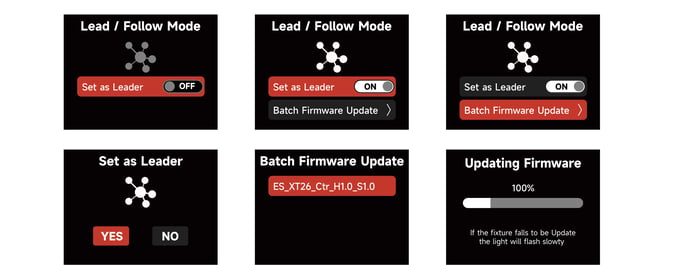
Set a fixture as either a Leader or a Follower. The Leader automatically sends its settings to Follower fixtures to keep them synchronized. Batch firmware updates from a USB drive in the Leader's port are also supported. The Leader must be connected to the Follower fixtures over DMX for batch updates to work.
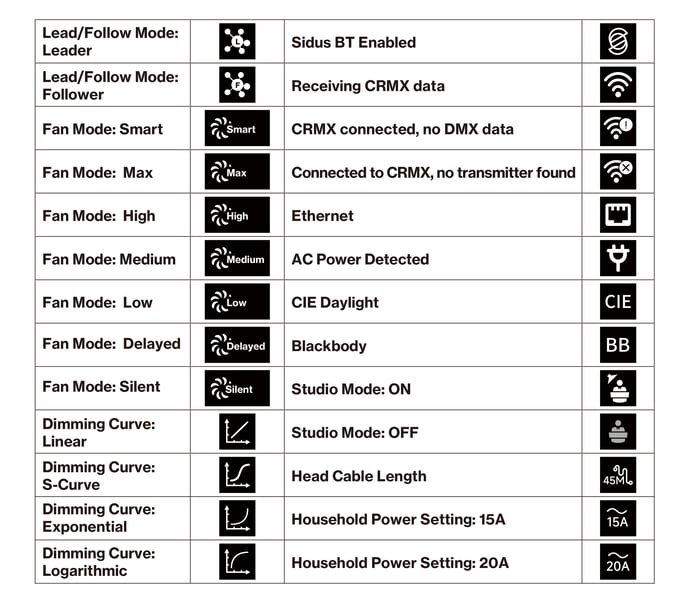
Status Indicator Icons
The Control Box's screen uses these icons to indicate status: