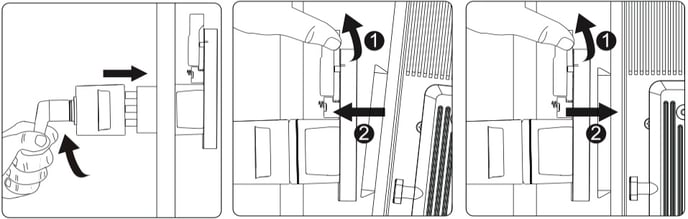
1. Attaching/Detaching the protection cover.
Pull back the retaining pin, rotate the cover clockwise, then detach the cover. To reattach the cover, insert it into the Bowens mount and rotate counterclockwise.

Always remove the protection cover prior to turning on the light. Always re-install the cover when packing it away.
2. Attaching/detaching the Hyper-Reflector
To install the reflector, pull back the retaining pin, insert the reflector into the Bowens mount, and rotate it counterclockwise as shown in the following pictures. To remove the reflector, pull back the retaining pin and rotate the reflector clockwise.
 3. Setting up the Lamp Head
If using a 5/8in / 16mm stand (Baby Pin), mount the Lamp Head onto the stand and proceed to fix it in place using the Stand Mounting Screw / Tie-Down on the Baby Pin Receiver/Mounting Column.
If using a 1.125in / 28mm stand (Junior Pin), then mount the Lamp Head into the Junior Pin receiver, and fix it in place using the Tie Down on the stand.
Loosen or tighten the tilt lock mechanism on the yoke to adjust the fixture's angle of tilt.

4. Lightning Clamp Operation Instructions
- Clamp the Lightning Clamp onto a light stand.
- To attach the control box, rotate the release lever to unlock the quick-release baseplate, then mount the control onto the Lightning Clamp (the release lever will automatically spring back)
- To remove the control box, grasp it firmly, then unlock the quick-release plate by turning the release lever, and detach the control box.
Specifications
| Weight | 670 / 1.48 lbs | Sizes (L*W*H) | 10.35x8.74x12.5cm / 4.07x3.44x4.92in |
| The Lightning Clamp can clamp onto square or round pipe with a diameter between 2-5cm or 0.79-1.97in. | |||
5. Connect the Lamp Head to the Control box
Connect the Lamp Head to the control box using the LS 600 Series 5-Pin Weatherproof Head Cable.

*Hang the cable using the report to
manage and reduce the tension on the cable
Disconnect the Head Cable by pulling up the collar on the connector. This will disengage its locking mechanism.
Operations
1. Press the Power button to turn the light on and off

1. Brightness
2. Dimming curve
3. Wireless Mode
4. Remaining Operating Time
5. Fixture Bluetooth Serial Number
6. Battery Level / AC Power Symbol
2. Press the Power button to turn the light on and off
2.1 Rotate the Brightness/Control Knob to adjust the intensity of the light from 0-100% in 0.1% increments. The speed with which you turn the knob will change the rate of increase or decrease.

2.2 Press the MENU button to enter the System Menu interface. In the System Menu you'll find Battery Power Options, DMX Mode, Dimming Curves, Fan Mode, Studio Mode, Control System, Language, Update, and Effects.
2.3 FX Control
Press the (FX + C / D) button to enter or exit the lighting effect mode. Press the (FX + [+] / [-]) to toggle different effects.
Press the ([+] / [-]) buttons to adjust the output of the light. Press the ( ◀︎ / ▶︎ ) buttons to toggle the effect frequency.

a. Enter or Exit Effect Mode

a. Paparazzi Mode
b. Fireworks Mode
c. Faulty bulb Mode
d. Lightning Mode
e. TV Mode
f. Pulsing Mode
g. Strobe Mode
h. Explosion Mode
The remote control can only be used to operate lighting effects if the lights are in groups C or D.
4. Connecting to DMX
4.1 Connect a standard DMX Controller
 Connecting to DMX to only one 600d Pro

Daisy chaining multiple lights using DMX
The DMX interface schematic is shown in the pictures below:
 1. Signal Common 1. Signal Common
 2. Data 1- (Primary Data Link) 2. Data 1- (Primary Data Link)
3. Data 1+ (Primary Data Link) 3. Data 1+ (Primary Data Link)
4. Data 2- (Optional Secondary Data Link) 4. Data 2- (Optional Secondary Data Link)
5. Data 2+ (Optional Secondary Data Link) 5. Data 2+ (Optional Secondary Data Link)
4.2 Channel Selection
In DMX Mode, match the channel of your DMX controller with the light and then adjust accordingly.
The default DMX channel is "001".
The range of DMX channels is 1 to 512.
5. Using the Sidus Link App
You can download the Sidus Link app from the iOS App Store or Google Play Store for enhancing the functionality of the light. Please visit sidus.link/app/help for more details regarding how to use the app to control your Aputure lights.
